:quality(75))
:quality(75))


:quality(75))
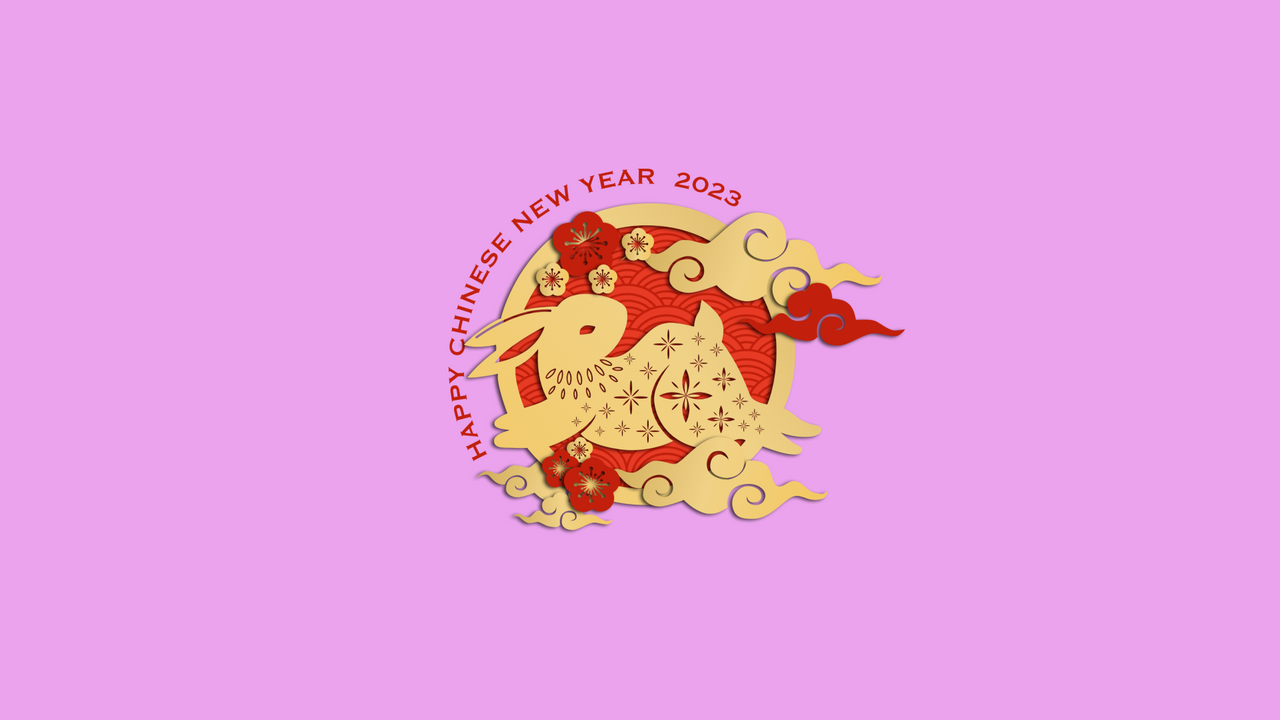
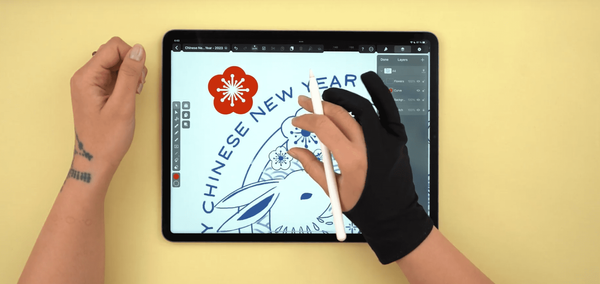
As we celebrate the Chinese New Year of the Rabbit, we wanted to make a rabbit window decoration tutorial with our talented in-house Illustrator, Aysel, for the occasion.
In this tutorial, we will guide you through the steps with written instructions, screenshots, and additional video snippets.
Jumpstart your ideas with Linearity Curve
Take your designs to the next level.
If you have never used Linearity Curve (formerly Vectornator) before, you can visit the Linearity Academy for beginner tutorials and exercises.
• iPad
• Apple Pencil
• The latest version of Linearity Curve
What you'll learn
• How to import a reference image
• How to use the Shape Tool
• How to use the Pen Tool
• How to perform a Boolean Operation
🎨 Hex color codes ysed in this tutorial
#E53C27 bright red (wave pattern fill color)
#C52410 dark red (cherry blossoms fill color, wave pattern stroke color, font color)
Golden gradient
Linear Gradient, gold, horizontal direction
#C9A85B (color slider left)
#EBCF8D (color slider middle)
#EFC564 (color slider right)
(cherry blossoms, clouds, rabbit, and background ring fill color.)
🎨 Read more about the Hex Color Code on our Blog and Learning Hub
🚧 With the iPadOS 16 updates, we unified the iPad Inspector for a simplified interface. Instead of five tabs, the updated Inspector now contains the following tabs: The Style Tab, Layers Tab, and the Library Tab.
Some links to the Learning Hub posted here refer to the pre-update Inspector layout, and others to the updated Inspector layout.
The video was filmed using the Linearity Curve version with the updated Inspector layout; thus, the screenshots taken from the video display the updated Inspector interface in this tutorial.
💡 Pro-tip - You can follow the tutorial on Mac too. You can navigate the Mac interface by visiting our Learning Hub for Mac ~ic-learning-hub~~ic-learning-hub~ Simply set the toggle on every linked site in this tutorial from iPad to Mac, and you can read the corresponding section for Mac.
You can only refer to the blog tutorial or additionally watch the corresponding YouTube tutorial video below:
Prepare the document
Before we start drawing, we must import the reference sketch first.
Create a new document in Linearity Curve by tapping the ic-create-docic-create-doc button ic-create-docic-create-doc in the Gallery and selecting New Document ic-new-documentic-new-document.
You can choose between a Document Template ic-doc-templatesic-doc-templates or manually set the document size in the New Document ic-new-documentic-new-document menu.
If you want to draw the reference image on paper, take a photograph, scan it, or draw it with design software. You can import the digital reference image into Linearity Curve with the Import Tab ic-import-tabic-import-tab.
You can access the Import Tab c-import-tabic-import-tab by tapping the button ic-create-docic-create-doc at the top right corner of the Gallery and then selecting Import.
When the newly created document is opened, go to the Library Tab ic-icon ic-library-tab in the Inspector, select the reference image and adjust its placement on the canvas with the Selection Tool ic-selectionic-selection.
If you don't want to draw the reference image, you can download the reference sketch from Aysel.
Additionally, you can download the Linearity Curve document, which contains the illustration created in this tutorial.
Now that we have imported the reference image let’s look at the image composition.

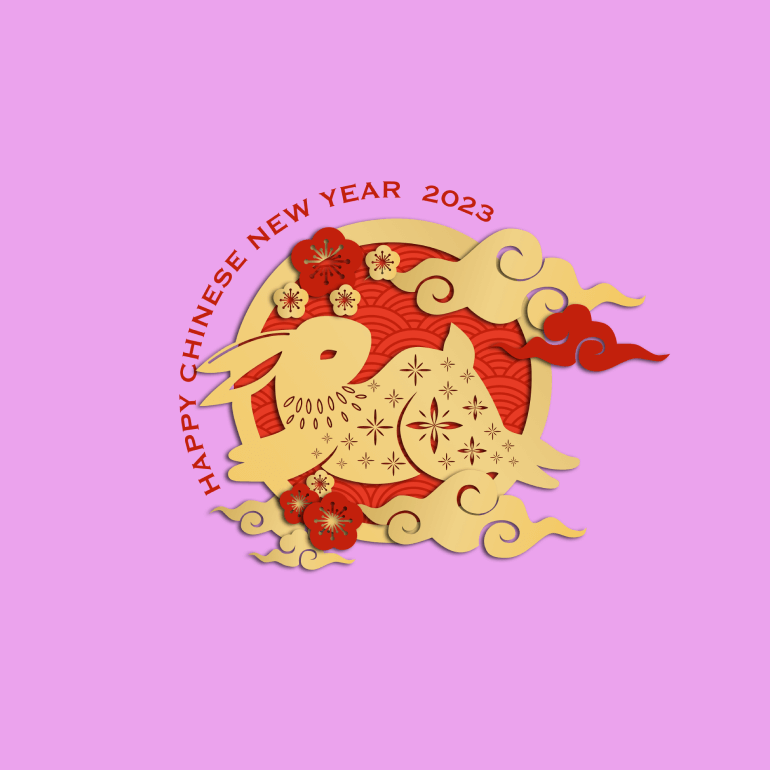
We have a circle in the background filled with a wave pattern. The jumping rabbit is placed in the foreground of the circle over the wave pattern. Additionally, Aysel drew several clouds in soft, flowing lines and cherry blossom flowers arranged around the rabbit. The lower body of the rabbit is covered with star-shaped flowers. The title Happy Chinese New Year 2023 is placed along the circular background shape.
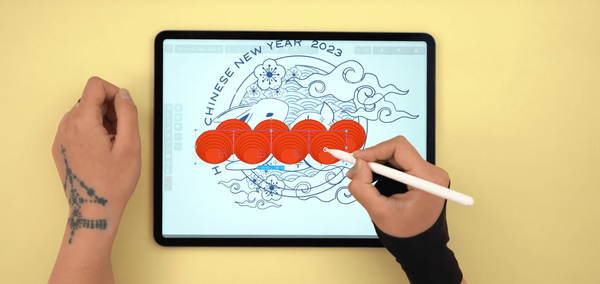
Create the background waves
In the next step of our tutorial, we’ll draw the background wave pattern.
Before we start drawing, please prepare your color palette first! The advantage of a color palette is that you can directly tap on the color in the palette to change colors without needing to set the Hex Color Code manually.
You can import the downloadable color palette below via the Palettes Tab ic-palettes-tabic-palettes-tab into your document
Before drawing the window decoration, create a new layer ic-add-layeric-add-layer to keep the elements of your illustration organized. Every newly drawn shape will automatically be organized as a new element within the selected layer. The elements can be accessed separately in the layer hierarchy organized in the Layers Tab ic-layers-tabic-layers-tab.
Activate the Shape Tool in the Tool Bar on the left side of the screen. Tap the three-dot button and select the Oval Tool ic-ovalic-oval. Choose the bright red #E53C27 color as the Fill color and the dark red #C52410 as the Stroke color.
Hold one finger down to draw a circle instead of an oval shape. Use the SelectionTool ic-selectionic-selection to move the circle over one of the half-circled waves.
Reduce the opacity of the circle fill, as it allows you to see the reference drawing or image while drawing.
You can reduce the opacity of your fill by using the Opacity Slider ic-opacityic-opacity in the Appearance Section ic-appearance-tabic-appearance-tab or the Quick Actions Bar ic-quick-actionsic-quick-actions displayed at the bottom of your selected shape.
Scale the circle a bit so that it perfectly fits the upper line of the wave.
Master the Pen Tool in Linearity Curve
Unlock the full potential of the Pen Tool for your designs. Our detailed guide provides step-by-step instructions to help you create precise and dynamic vector graphics.
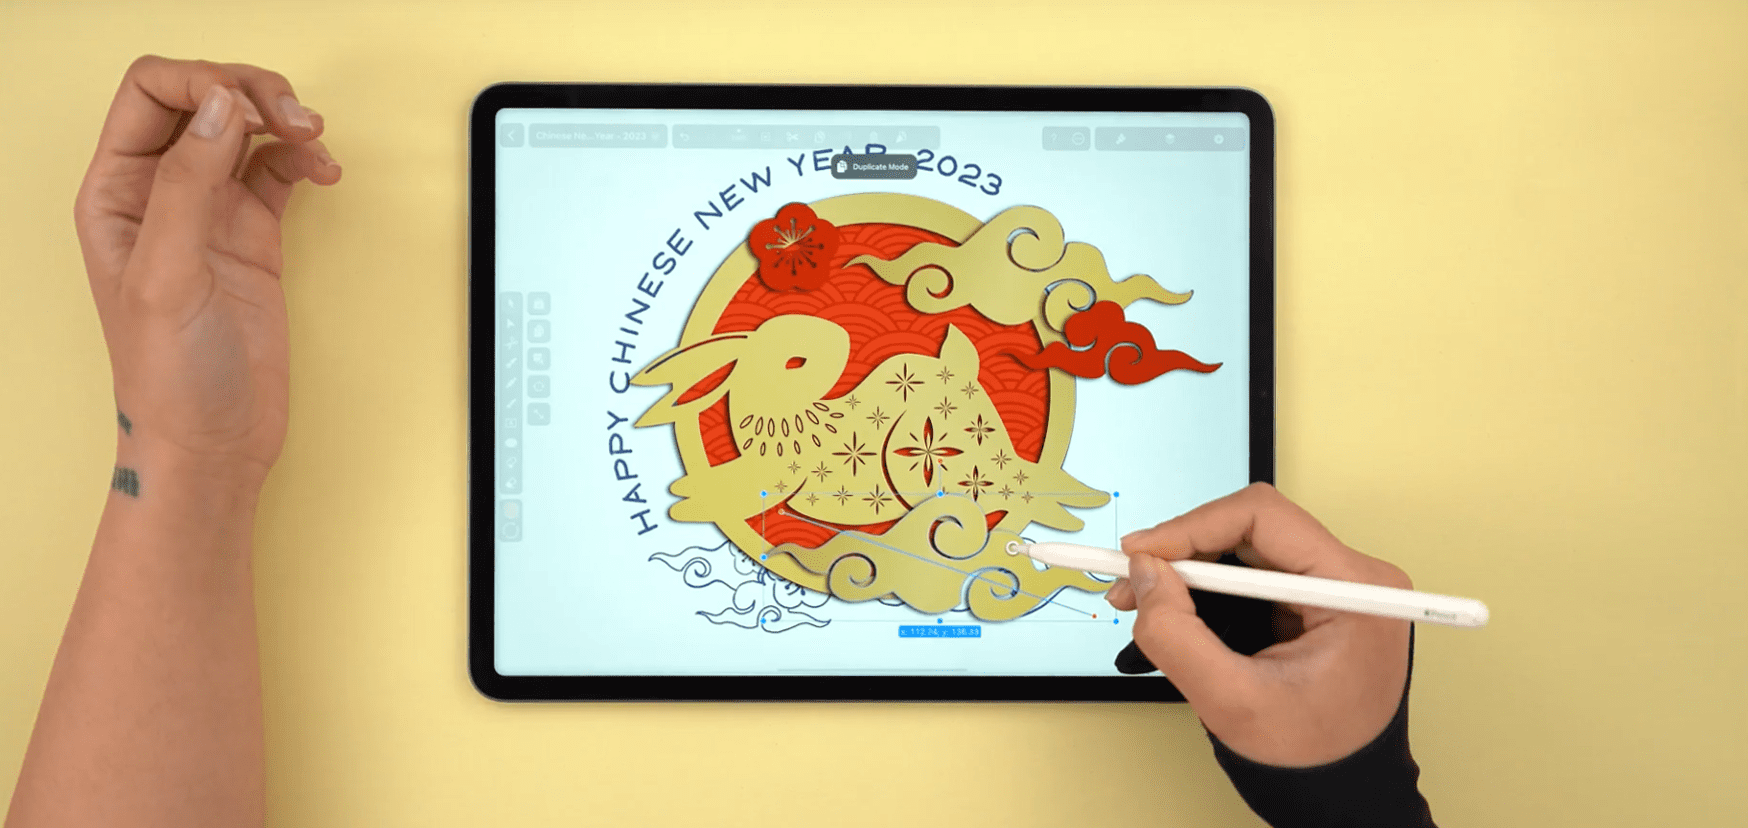
With the Selection Tool ic-selectionic-selection, duplicate the shape by using copy-paste, or you can use the Duplicate Mode ic-duplicateic-duplicate. To activate it, tap on the second icon at the right of the Selection Tool ic-selectionic-selection. Once active, you can tap and drag any selected object to create a duplicate of it.
If you want to produce a scaled-down copy of the original shape as we want to do it for this tutorial, you can use the Duplicate and Scale Mode.
Place the second, smaller shape directly below the top wave of the half-circle. Duplicate and Scale four more shapes and place them so that they match the lines of the reference image.
Select all six red circle shapes via Multi Select Mode ic-multiselectic-multiselect and Group ic-groupic-group them.
You can find the Group ic-groupic-group and Ungroup ic-ungroupic-ungroup buttons in the Arrange Tab. When multiple objects are selected on the canvas, the Grouping Options will also appear in the Quick Actions Bar ic-quick-actionsic-quick-actions.
Activate Snapping and Smart Guides in the Canvas Settings and the Quick Settings.
Duplicate the Group ic-groupic-group of six circles thrice and align all four grouped circles in a row.
Use the Align options ic-alignmentic-alignment in the Arrange Tab ic-arrange-tabic-arrange-tab to align the circles in a straight line.
Group ic-groupic-group the four circles in a row and Duplicate ic-duplicateic-duplicate them. Place the second row displaced to the first one. Repeat until the circle of the reference image is completely covered with red circles, and Group ic-groupic-group all the pattern elements. Then save the entire pattern to your templates in the Library Tab ic-library-tabic-library-tab of the Inspector.
Later on, we'll use the saved pattern template and create a Mask ic-maskic-mask for the background.
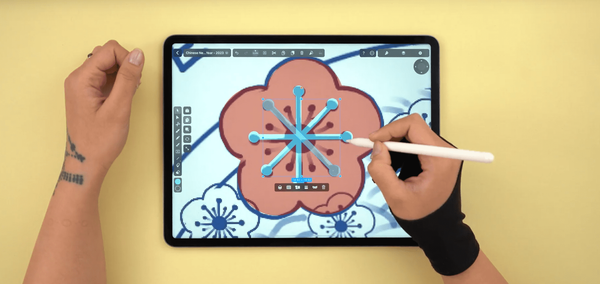
Draw the cherry blossom
In the next step of our tutorial, we’ll draw the cherry blossoms. Toggle the stroke off , and for the fill color, select dark red # C52410.
Select the Oval Tool ic-ovalic-oval and draw a circle (while holding down one finger) over one of the cherry blossoms in the reference image.
Then select the circle shape and use the operation Duplicate and Rotate. This Combo Gesture allows you to create Rotational Copies.
To activate the operation, tap the Rotate Mode ic-rotateic-rotate button and the Duplicate Mode ic-duplicateic-duplicate. Then select your shape and start dragging your finger around.
You can change the Pivot Point of your rotation by tapping anywhere on the canvas. Also, you can hold a second finger on your canvas while dragging to enable 45º snapping.
Each circle represents a flower petal. Draw five flower petals and ensure the pivot point is set correctly.
Select the five flower petals and reduce the opacity with the Opacity Slider ic-opacityic-opacity so that we can see the underlying reference image while drawing.
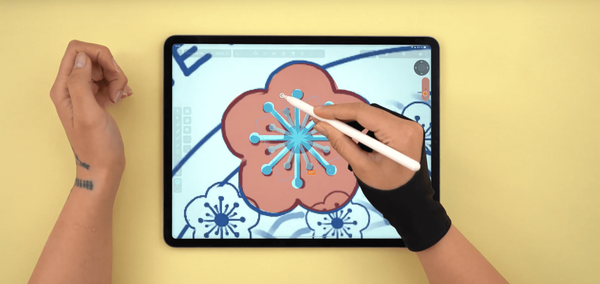
Use the same technique to draw the stamen of the flower. Draw a line using the Line Tool ic-lineic-line, available in the selection options of the Shape Tool. At the line's tip, place a circle with the Oval Tool ic-ovalic-oval. Unite the circles with the line by using the Boolean Operation Unite ic-boolean-uniteic-boolean-unite.
Use the operation Duplicate and Rotate again to arrange the stamen around the pivot point of the cherry blossom, and hold down on the finger to rotate at 45° increments.
Select all stamen elements and group them. Use Duplicate & Scale Mode to create a second stamen star on the flower petal. Rotate ic-rotateic-rotate the second star to be positioned and displaced to the first stamen shape. Create a circle and place it on the center pivot point of the stamen shapes. Select all shapes and Group ic-groupic-group them.
Always keep an eye on the reference image and ensure that each element perfectly aligns with the imported drawing.
After placing both stamen star shapes, select the red flower petal shape and use the Boolean Operation Subtract ic-boolean-subtractic-boolean-subtract.
On Linearity Curve for iPad, you can access the five available Boolean Operations ic-booleanic-boolean in the Path Tab ic-path-tabic-path-tab. Additionally, the Boolean Options ic-booleanic-boolean will appear automatically in the Quick Actions Bar ic-quick-actionsic-quick-actions when you select an element.
Draw the clouds
In the next step of our tutorial, we will draw the clouds. Toggle the stroke off ic-toggle-offic-toggle-off, and choose the golden Linear Gradient for the fill. You can select the gradient directly in the imported color palette or create one yourself using the hex numbers mentioned in the hex color codes list at the beginning of the tutorial. You can set the gradient's properties in the Color Widget's settings.
:quality(75))
:quality(75))
We will use the Pen Tool ic-penic-pen to draw the clouds. Reduce the opacity slightly to see the cloud reference image underneath.
Tap along the lines of the cloud. Tap only to create sharp edges, tap and drag to access the Bézier Handle to create curved lines.
When you are finished drawing the cloud, add it to the templates in the Library Tab ic-library-tabic-library-tab.
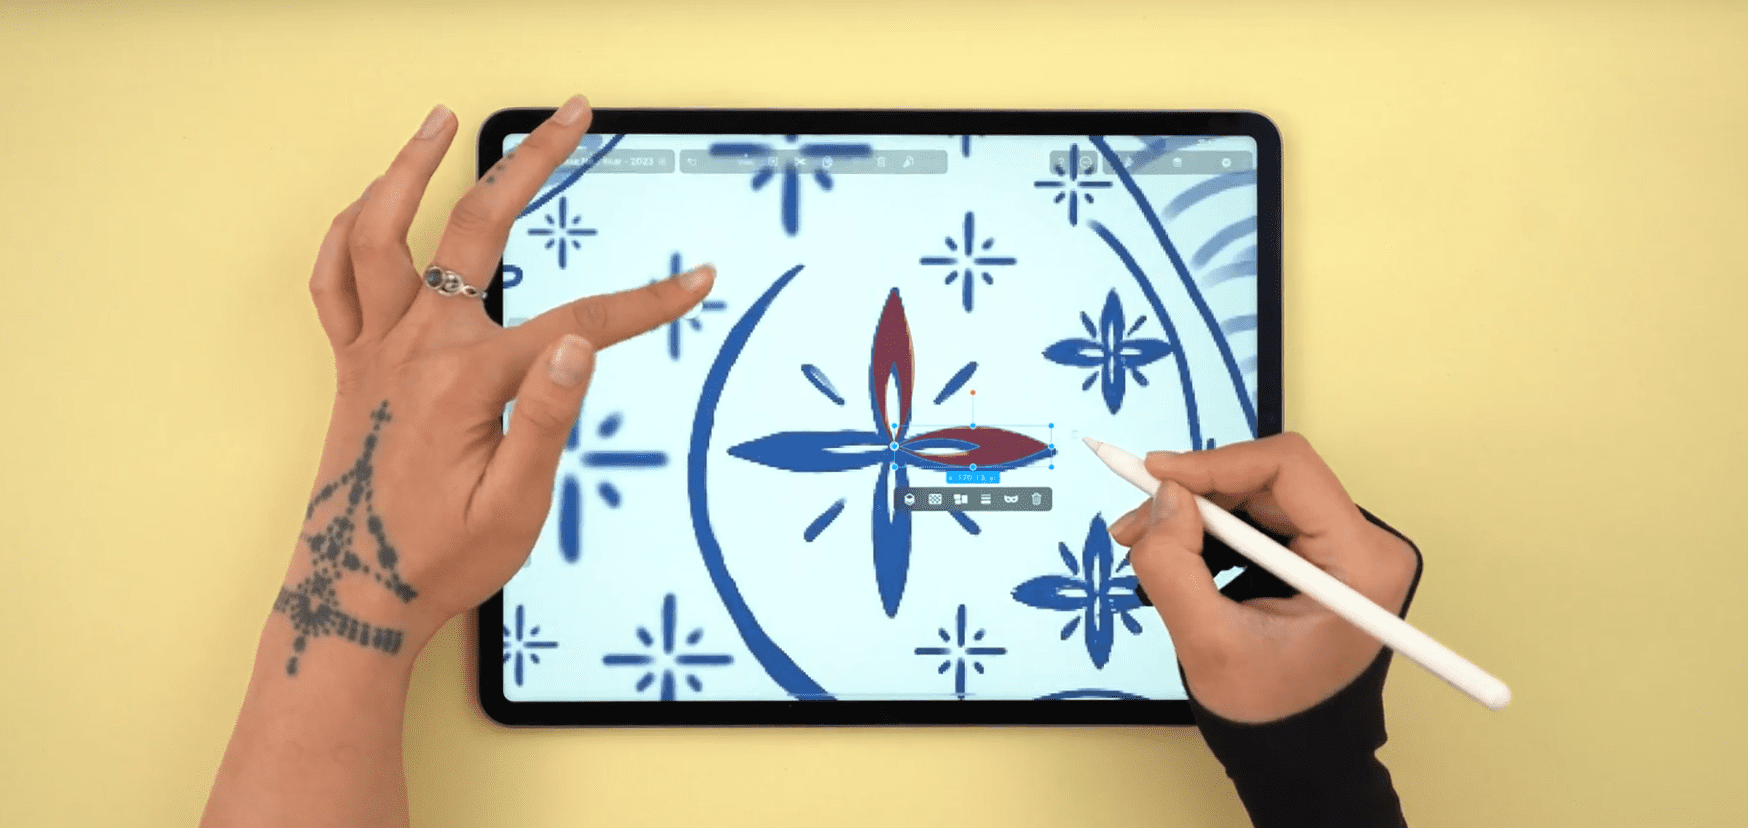
Draw the star-shaped flowers
Next, we will draw the little star-shaped flowers on the rabbit's lower half.
Switch back to the Shape Tool. The red color we used is still set when we activate the tool due to Stroke and Fill Memory. Linearity Curve now remembers the last Stroke and Fill setting of your tools.
Use the Oval Tool ic-ovalic-oval to create the base shape. Switch to the Node Tool ~ic-node~~ic-node~ and tap on the top and bottom nodes of your shape to sharpen the curve of the shape.
Create a second, smaller shape with Duplicate and Scale and stamp out the smaller shape with the Boolean Operation Subtract ic-boolean-subtractic-boolean-subtract.
Select, Duplicate and Rotate the shape in 45° increments while holding one finger down.
Draw the second, smaller star-shaped flower using the Oval Tool ic-ovalic-oval and Duplicate and Rotate.
Draw the rabbit
Let's draw the essential element of our window decoration, the rabbit!
Switch back to the Pen Tool ic-penic-pen. Due to Stroke and Fill Memory, the Tool remembers our last set fill color, the golden gradient.
Aysel chose to go the unconventional way and traces the outer circle of the background shape while including the parts of the rabbit that overlap the circle's boundaries, such as his ears and hind legs. Do not include the other elements that overlap the background circle, like the clouds, f.ex.
The next step is to trace the background elements of the inner circle that the rabbit doesn't cover.
Switch to the bright red color and trace the visible background areas with the Pen Tool ic-penic-pen.

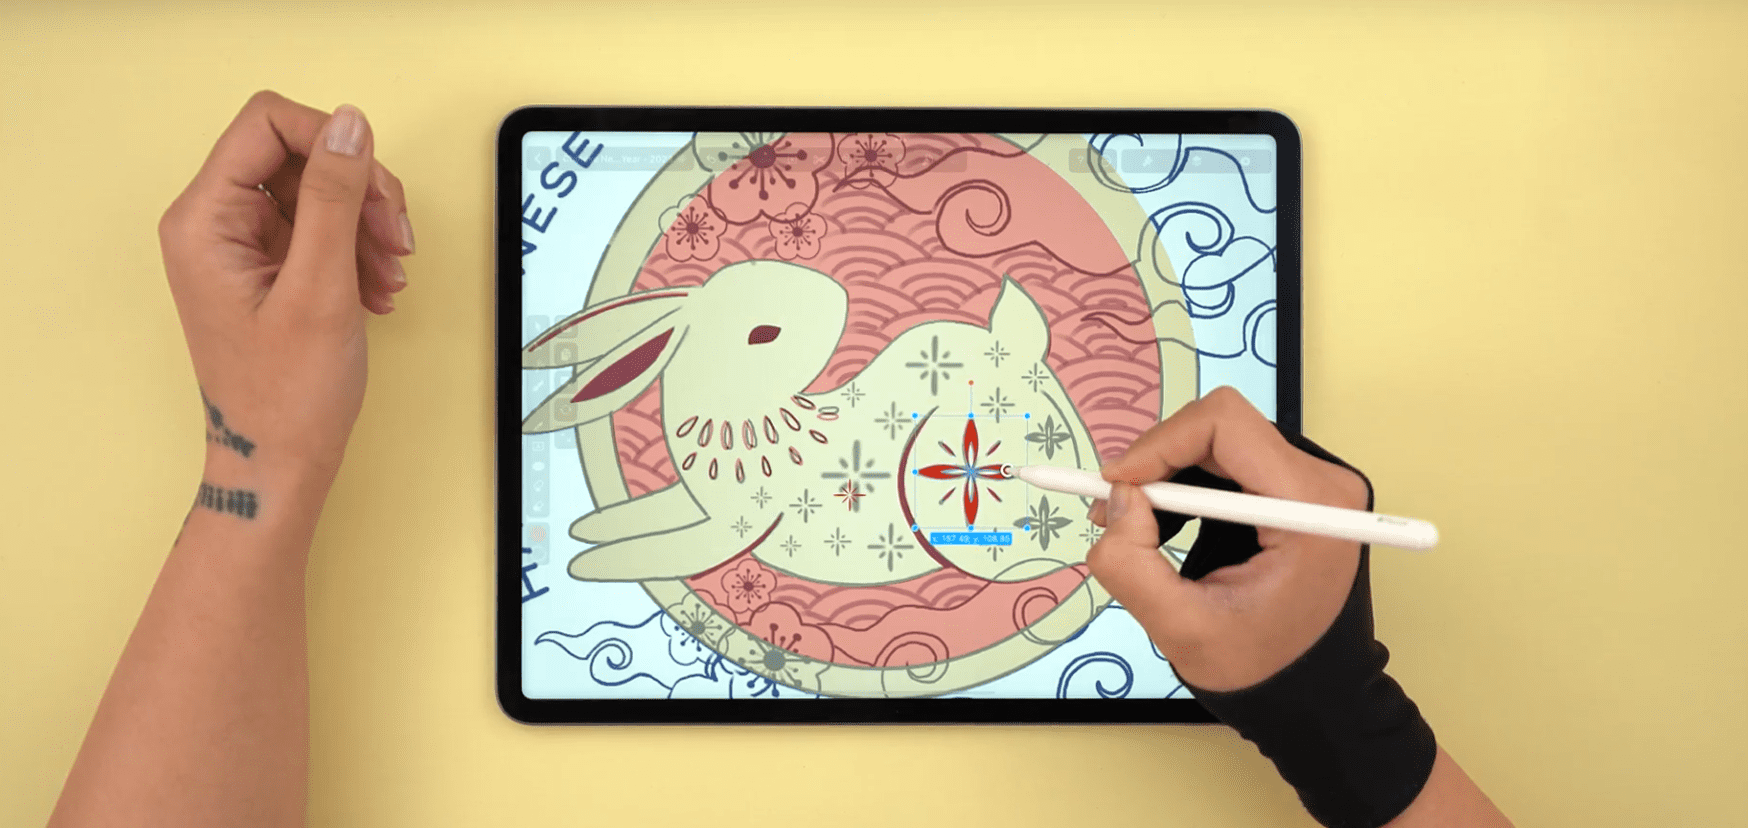
Then, add the final details to the rabbit, such as the eyes, inner ear shapes, and teardrop shapes at the rabbit's neck.
Select the star-shaped flower templates from the Library Tab ic-library-tabic-library-tab and place them on the rabbit while the Duplicate Mode ic-duplicateic-duplicate is activated.
Select all the red detail and background shapes on the canvas by activating the Selection Tool ic-selectionic-selection and dragging a selection rectangle around these shapes.
Then use the Boolean Operation Subtract ic-boolean-subtractic-boolean-subtract to stamp out the red star-shaped flowers from the golden rabbit's body shape.
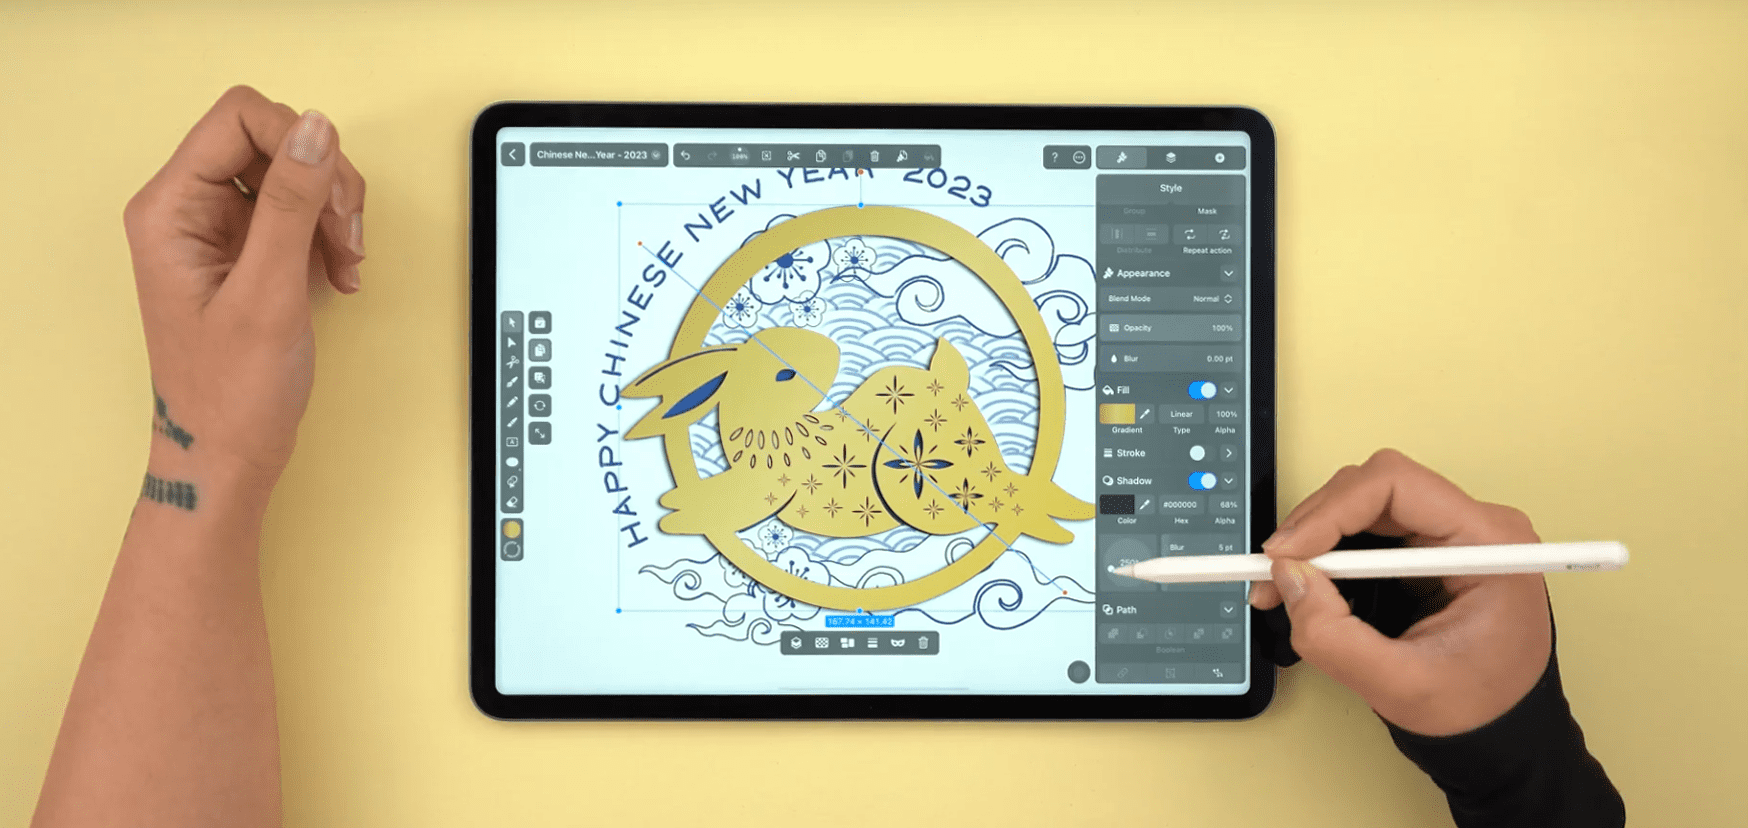
Add a shadow in the Shadow Section in the Style Tab ic-style-tabic-style-tab to give the shapes a paper-cut effect. Aysel chose a shadow angle of 250°.
Mask the background waves
In the next step of our tutorial, we will integrate the red wave pattern via Masking ic-maskic-mask. Add the previously saved wave pattern template we created in step 2 with one tap.
For the masking shape, we’ll create a circle that covers the background circle of the reference drawing. The masked shape will be the template with the red waves.
Ready to create brand assets that pack a punch?
Visit our Academy for free drawing design courses.
You can access the Masking Button ic-maskic-mask in the Arrange Tab ic-arrange-tabic-arrange-tab or the Quick Actions Bar ic-quick-actionsic-quick-actions.
The masking shape (in our case, the newly drawn circle) must be placed beneath the masked content, the red waves in the layer hierarchy.
You can arrange the shapes in the Layer Stack Hierarchy by using the Order Gesture in the Quick Actions Bar ic-quick-actionsic-quick-actions or the Arrange Tab ic-arrange-tabic-arrange-tab.
Select the previously saved cloud and cherry blossom templates and position and scale them on the canvas. Add a shadow to each newly arranged element.
Add text to your illustration
In our tutorial's next and last step, we will add text to our Illustration.
In Linearity Curve, you can place Text on a path ic-text-on-pathic-text-on-path, which means that the text will follow the path it is attached to.
As you can see in the reference image, the text follows the circular shape of the background. To make the text follow the circular shape, we’ll have to create a circular path first.
Select the Oval Tool ic-ovalic-oval, toggle the stroke off ic-toggle-offic-toggle-off, and keep the fill toggled on ic-toggle-onic-toggle-on. Hold one finger down and draw a circle that follows the curve of the text from our reference image.
Activate the Text Tool ic-textic-text in the Toolbar. Then, tap or drag anywhere on the canvas. A bounding box containing the word "Text" will appear on your canvas. Now, you can start writing using a digital or external keyboard.
In the text tool settings accessible in the Style Tab ic-style-tabic-style-tab, set the font to Copperplate and the Font Size ic-fontsizeic-fontsize to 38 pt. Set the text color to dark red #C52410.
Use the keypad to write the following text: Happy Chinese New Year 2023.
Select the text and the circle and tap Text on Path ic-textic-text in the Path Section ic-path-tabic-path-tab of the Style Tab ic-style-tabic-style-tab.
Now, the text is aligned with the circular path. You can rotate the text along its path to place it precisely in the same position as the reference image.
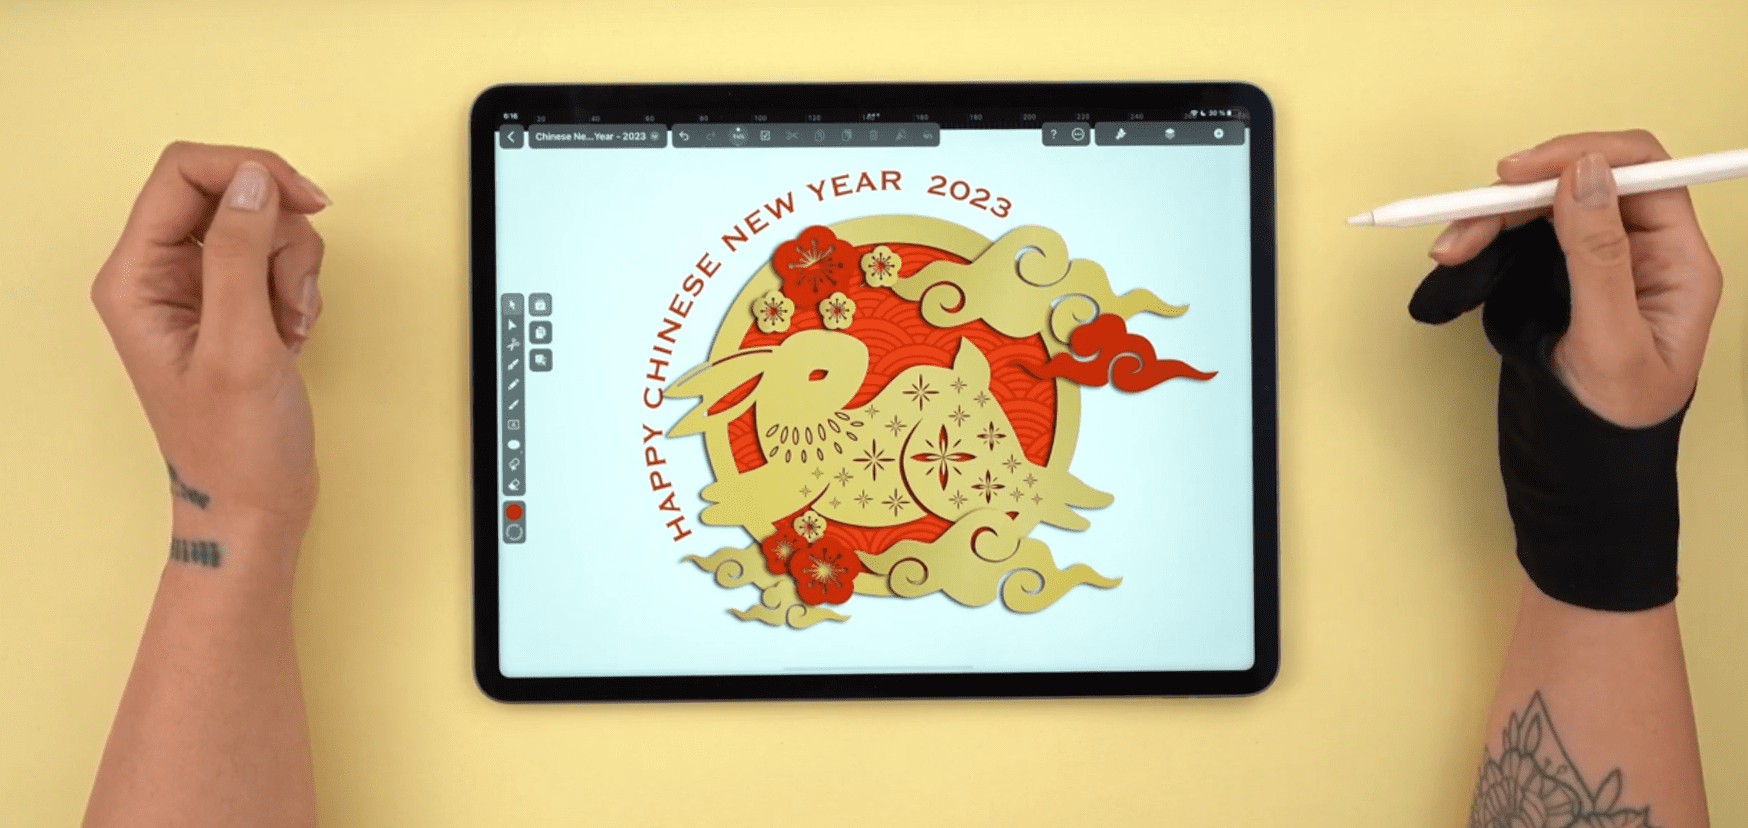
That's it! We are finished drawing our rabbit Chinese New Year window decoration!
In Linearity Curve, you can print ic-print-2ic-print-2 your document directly from your printer at home or export the document ic-exportic-export for external printing purposes.
You can print the rabbit window decoration on paper or cardboard or print it as a sicker.
I hope we could inspire you to celebrate Chinese New Year creatively with us, and we're all excited to see you post your rabbit Chinese New Year window decoration on our community art gallery and social media!
Happy Chinese New Year!
Jumpstart your ideas with Linearity Curve
Take your designs to the next level.
Share this!
Marion Gerlinger
Marion is a contributing writer to the Linearity Blog.


