:quality(75))
:quality(75))


:quality(75))

💡 Key insights
- Become a better designer by mastering the Pen Tool, an essential design skill that allows you to craft intricate shapes and define seamless curves, unlocking the possibilities of your graphics.
- For marketers, the Pen Tool is also great for crafting branding, promo materials, and multimedia campaigns to create engaging content.
- Leap into the moving video era by bringing your graphics to life in Linearity Move, empowering animation beginners and pros to create dynamic animations in any shape or movement easily.
- Overcome the limits of other platforms, many of which don’t feature advanced tools like the Pen Tool.
Ask any illustrator or designer which tool they use the most, and they’ll most likely answer the Pen Tool. That’s why Linearity is the platform of choice for thousands of designers and illustrators worldwide. Linearity’s Pen Tool is one of our software suite’s most powerful and user-friendly features.
We’ll get into the hows, whats, and whys soon, but since you’re here already, we think it’s safe to assume you want to know more about this invaluable resource. By the end of this tutorial, you’ll have a solid understanding of the Pen Tool’s features—from adding or deleting anchor points to using Bezier curves to create beautiful shapes.
It might take time to learn these basics and even longer to master them, but all good things come with practice. Let’s get started.
Jumpstart your ideas with Linearity Curve
Take your designs to the next level.
What is the Pen Tool?
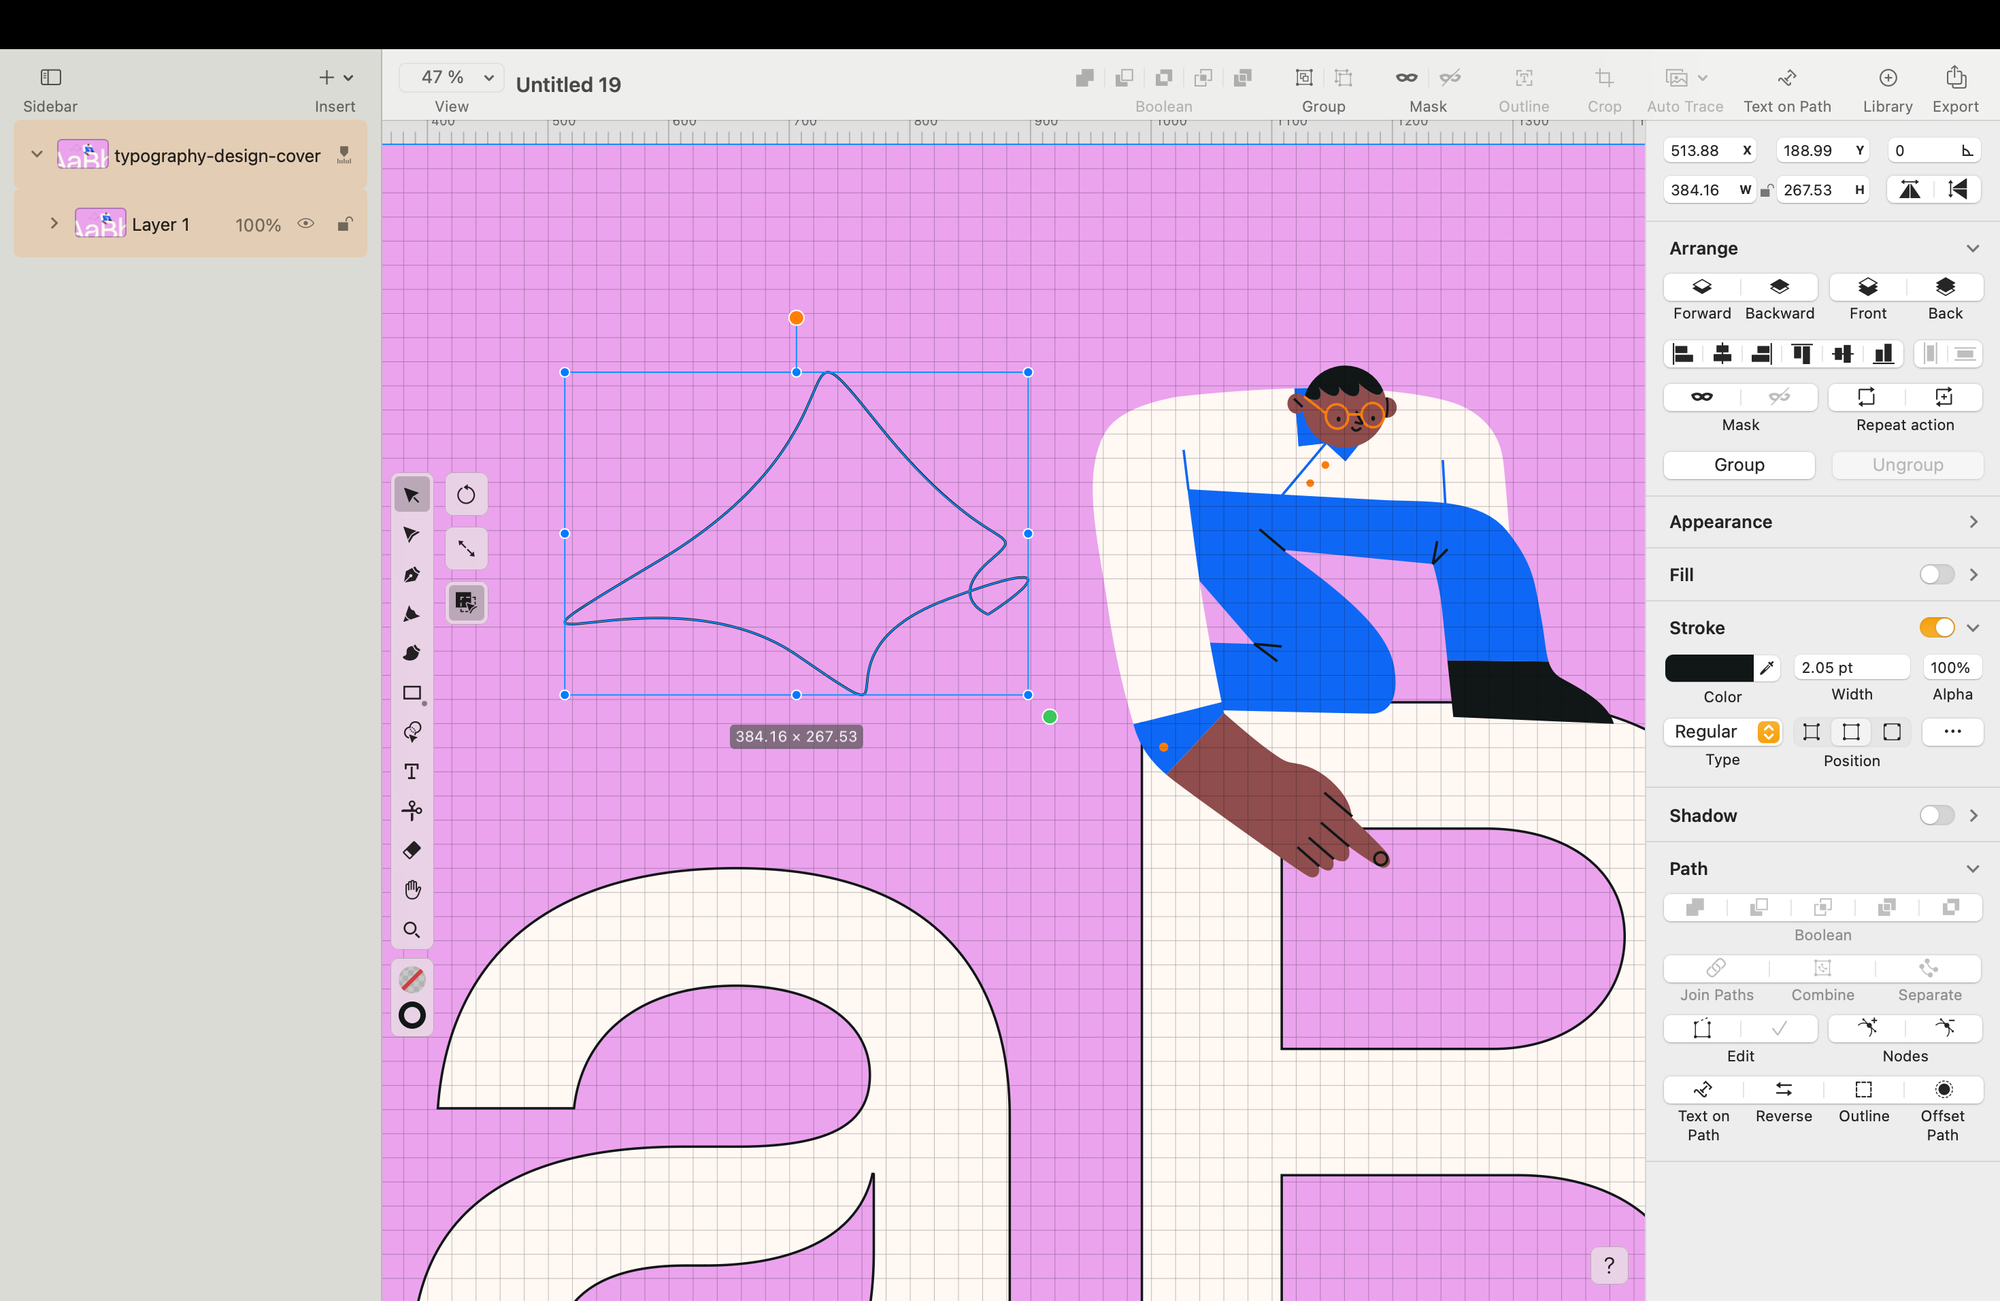
With the Pen Tool, you can define anchor points and adjust the associated curves by manipulating two handles connected to each anchor. No worries. We’ll dive deep into all these concepts soon.
The Pen Tool allows you to create straight or curved paths that can be used as independent segments or complete shapes. It's the most direct way to create vectors in Linearity Curve.
When to use the Pen Tool?
The Pen Tool does not draw wherever you drag your pencil, finger, or mouse, just like a Brush or a Pencil Tool would. If you tap and drag your pencil on the Artboard, all that happens is that one anchor point appears with two handles that you rotate around it. As you let go, a curved path appears that is not connected to anything until you tap the canvas again.
It’s a strange behavior if you’re not used to it.
Also, you won't need the Pen Tool to create perfect shapes like circles, rectangles, or even stars. We have the Shape Tool for that. Linearity Curve's Shape Builder Tool allows you to create any shape you can imagine, such as rectangles, circles, polygons, or straight segments.
It's much easier to draw them this way.
The Pen Tool is essential for drawing curves precisely. Mastering the art of vector illustration requires learning many tools and techniques, but nothing may be more important than knowing how to create a freehand path or shape manually.
Master the Pen Tool in Linearity Curve
Unlock the full potential of the Pen Tool for your designs. Our detailed guide provides step-by-step instructions to help you create precise and dynamic vector graphics.
The Pen Tool is useful for tracing precise paths for images (if you don't use Auto Trace), turning raster graphics into vectors, and removing backgrounds. It can also manually create custom shapes that can’t be recreated using other tools.
For example, you can create polished lettering translated into logos or a custom typeface.
The anatomy of a vector path
The Pen Tool draws paths.
Anatomically, paths are defined by a mathematical formula that characterizes how the line or curve looks. They’re also known as Bézier Curves.
There are many types of Bézier Curves. They’re differentiated by how the curve is controlled, but “cubic-Bézier” is the most commonly used in graphics software. And Linearity Curve is no exception. What does that mean?
Bézier Curves are created by the handles that extend from any vector point, also known as a node. At the end of each handle, there is an adjustment point, and if you pull on it, the handles seem to pull the path outward into a curve magnetically.

If you want to geek out on what actually happens "Under the hood" of a Bezier curve, watch this video:
A path can be either open, like a simple arc, or closed, like a circle. For an open path, the anchor points at the start and the end of the path are called its endpoints.
Node types
Depending on your Node Type, your path will take a specific shape in Linearity Curve.
There are four types of nodes:
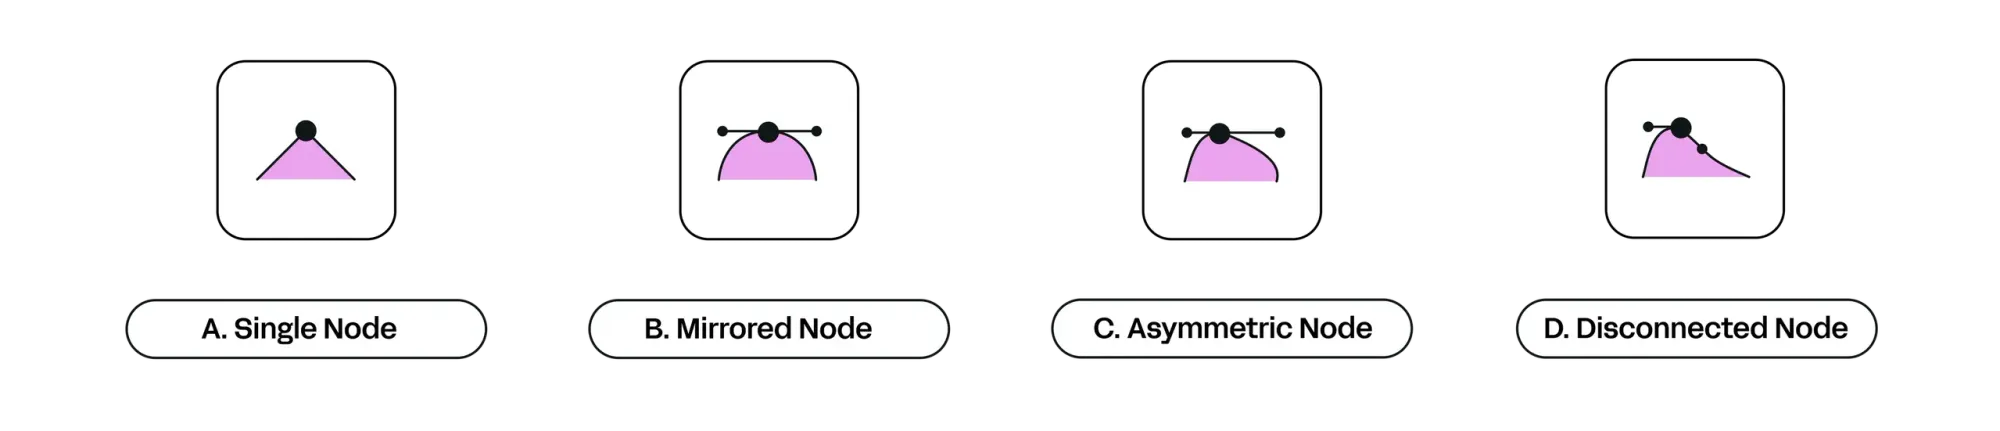
- A Single Node Type (A) is when your path abruptly changes direction. It is very useful for creating sharp edges or sharp shapes. Remember that this Node type does not have handles since you are not creating a curve with it.
- A Symmetrical Node (B) defines a smooth, symmetrical curve on each side of the point.
- Conversely, a path defined by an Asymmetrical Node (C) is not.
- With a Disconnected Node (D), you can control each of the handles surrounding a node independently from each other. And it’s a fantastic way to create complex shapes with as few nodes as possible.
What do the different colored nodes mean?
This feature, available in Linearity Curve and Linearity Move, is meant to help designers and illustrators in their creative process.
The idea is simple: the start node is green, the end is red, and the rest is blue. This new color-coding system makes understanding what’s happening with your vector paths easier.

How to use the Pen Tool
You can activate the Pen Tool using the P keyboard shortcut.
Tap the Pen Tool icon in the Toolbar if you’re working on your iPad or iPhone without a keyboard. You’ll find that Linearity Curve's Toolbar is where you can access all of the app’s built-in tools, like the Selection Tool, Text Tool, Pencil Tool, Brush Tool, Rectangle Tool, Ellipse Tool, and more.
Pen Tool: The Pen Tool creates precise paths and shapes by placing anchor points and adjusting control handles. It's ideal for creating smooth curves and intricate designs with precision.
Pencil Tool: The Pencil Tool is a freehand drawing tool that allows users to sketch and draw directly on the canvas. It's best suited for creating rough sketches and quick illustrations with a more natural, hand-drawn feel.
Brush Tool: The Brush Tool simulates traditional painting techniques, allowing users to apply strokes of color to the canvas. It offers a wide range of brush presets and settings for varying textures and effects, making it suitable for painting, shading, and adding artistic touches to designs.
You can use the Pen Tool with your finger or an Apple Pencil.
In the next part of the tutorial, we will focus on how the Pen tool works in Linearity Curve on a desktop device, but you can always refer to our Learning Hub section for more information on how the Pen Tool works on other devices.
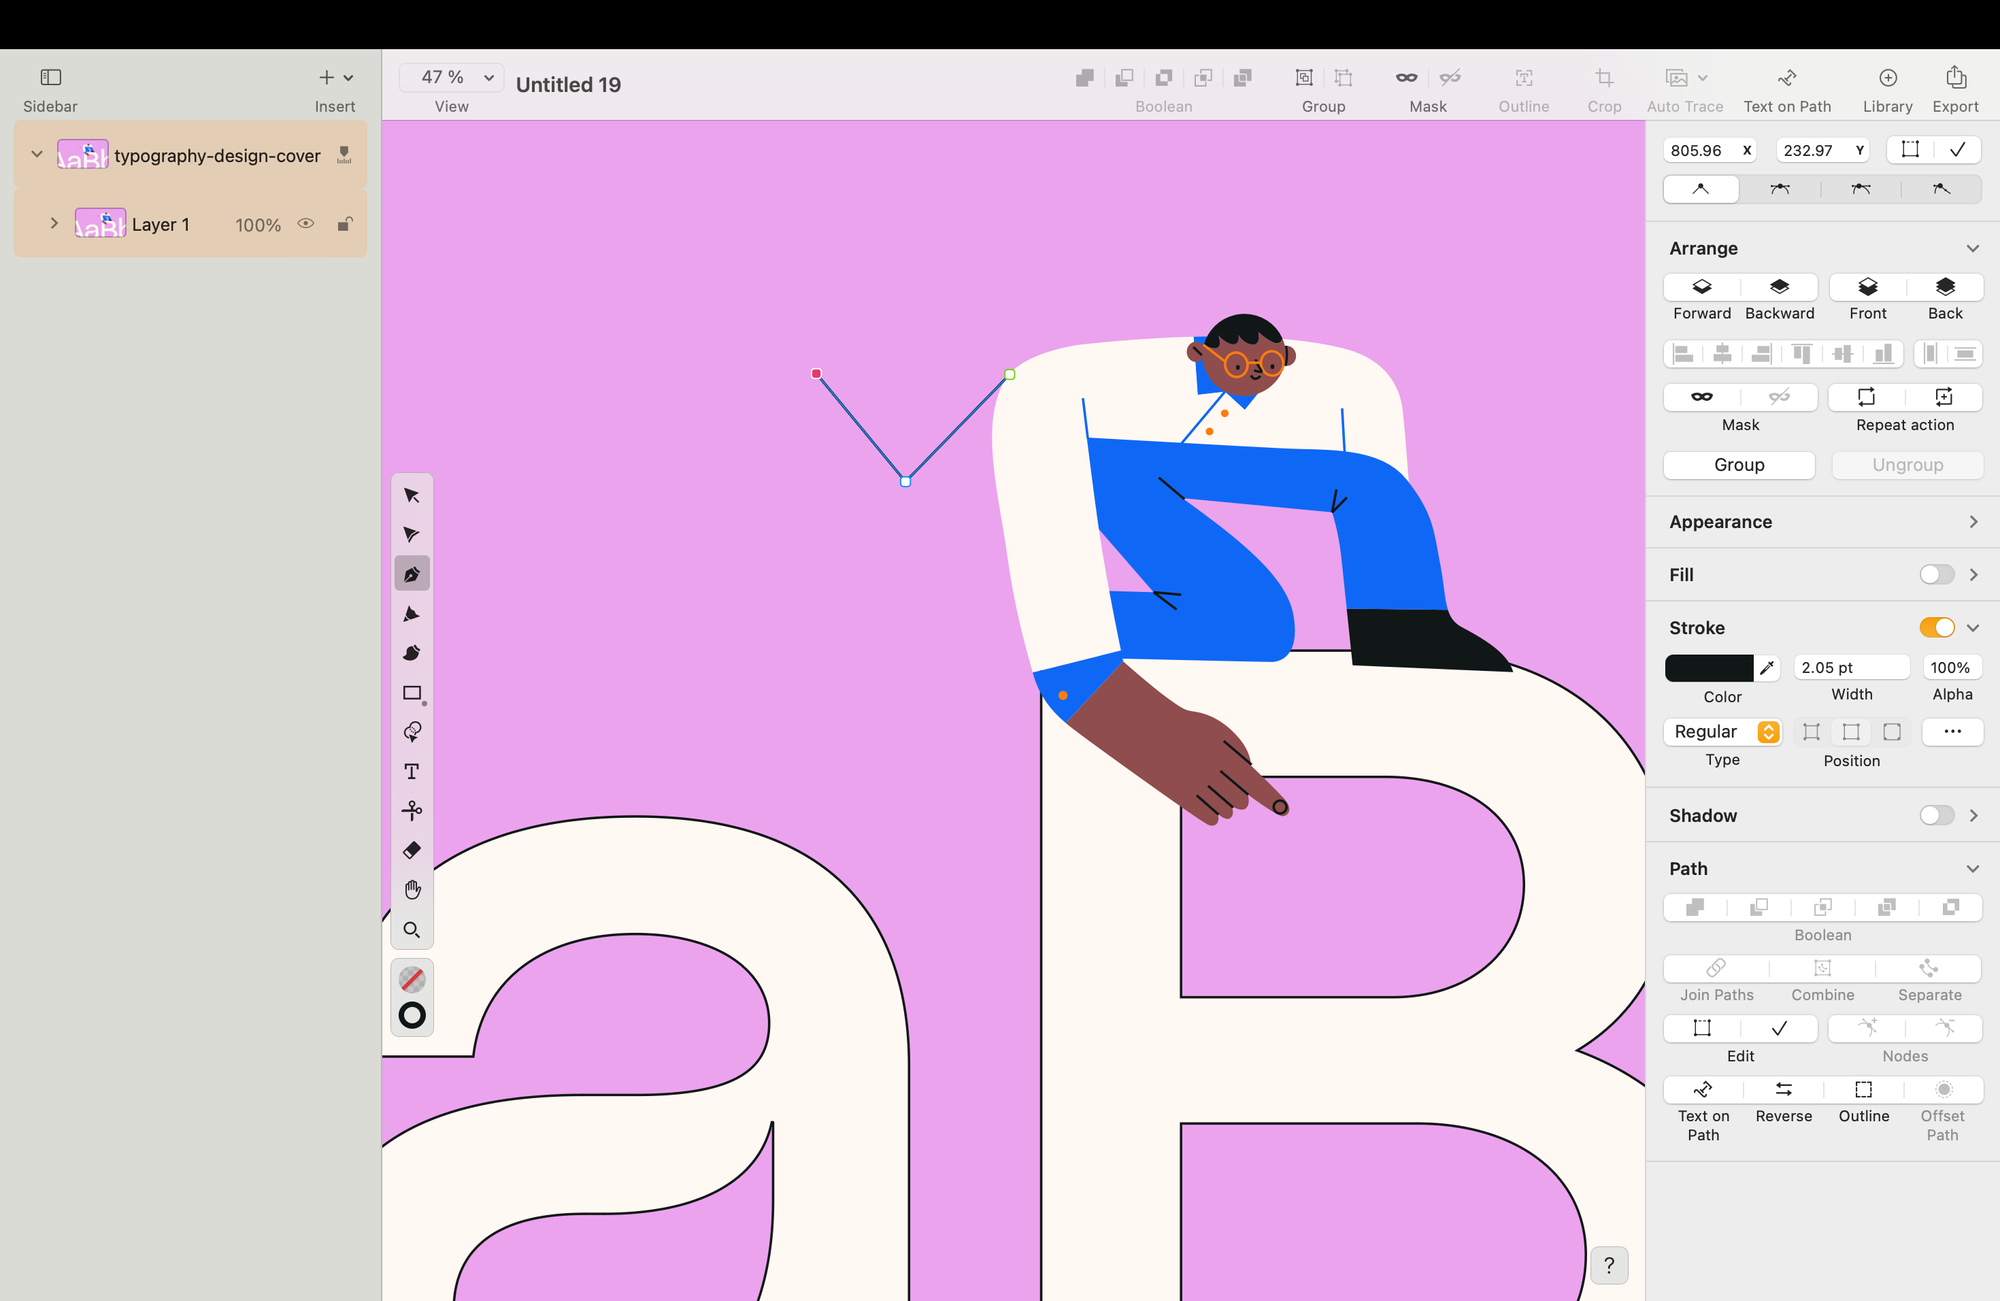
Drawing straight paths
Click on the Pen Tool in the Left Toolbar to activate the Pen Tool. Click anywhere on the Artboard to add your first anchor point. If you click again, you add another anchor point, generating a line between the two points you made. You've just created a very basic path—a line.
But if you keep clicking, you can create new anchor points to form a shape path with sharp corners.
When you select one of your anchor points, no handles or direction lines appear since this is a single-node type (1).
How to close straight paths with the Pen Tool
Closing paths is easy.
To close your path, position the Pen Tool over one of the two endpoints and click once. Then, click again over the other endpoint. You will be left with a polygon.
Select a different tool or tap anywhere on the menu to leave a path open.

How to create shapes with straight paths
How to create shapes with straight paths with the Pen Tool
You want to create perfectly horizontal or vertical lines to draw a perfect square. Then, you'll have to lock your path onto the X or Y axis of your Artboard.
To do that, activate the Perpendicular Grid and then the Snap to Guide setting:
- To set up a Perpendicular Square Grid, choose View, then Grid Settings, and then select Perpendicular.
- To activate the Snap to Grid setting, go to View, and Snap to Guides from the Menu Bar to activate the snapping option.
Use the intersecting grid lines as a starting point for your node, and then allow the intuitive Snap to Guide to draw your straight line horizontally, vertically, or diagonally.

It may be easy to create this, but you might not use a straight path segment all that often. As mentioned, you can create perfect shapes with our Shape Tool. But it's up to you how you choose to design with vectors.
But learning straight vector lines is an excellent first lesson. Now, is anyone ready to practice?
Straight path Pen Tool practice
Let's put those design muscles to work.
This straightforward exercise will help you become more comfortable creating complex shapes with the Pen Tool. The key to using the Pen tool is practice, practice, practice.
Create a new Linearity Curve document and do the following:
- Draw open paths in zig-zags
- Draw closed paths of triangles and polygons where the first anchor point becomes the endpoint
- Draw a rectangle, a square, and a diamond shape
Have a look at the shapes we drew below. Try to replicate them before learning how to draw curved lines. Feel free to get creative and use a custom or gradient color to give your shapes more life.

Creating curved paths
The Pen Tool shines when creating curved paths.
Unlike straight line segments, which simply click once with your mouse, curved paths are created by clicking and dragging out the direction handles.
You first need to click once on the Artboard to set a starting point for your curve. Dragging your cursor determines the curve’s direction and arc.
Once you lift your cursor off the Artboard, you choose the direction of your second point. A curved path is drawn between your two nodes as you click and drag again.
Depending on your handles, you can create a shallow or deep curve. Try experimenting with how you drag your handles to understand how to create various shapes.
If you click and drag without taking any other action, Linearity Curve will automatically generate an Asymmetrical Node. This will be highlighted at the top of the Style Tab, where Node Types appear.
How to close curved paths
If you continuously create additional paths, you can close your shape by clicking once on the first node you created.
But let's say you have an existing open path on your Artboard that you want to close. Then you will need to use the Node Tool and Pen Tool simultaneously. First, select the entire path with the Node Tool, which helps you select individual points in your shapes and paths. Then, activate the Pen Tool and click on one of the two anchor points you want to close. Then, simply click on the other anchor point you want to connect. Now, you have a closed path.
Another super simple way to do this is to select an open path and click the “Close” icon (the open square) in the Style Inspector. Remember that the path in the bottom-most layer will stay positioned, while the paths above it will move accordingly to fit together.
Also, when adjacent path segments or Anchor Points do not overlap, Curve automatically adds a new line segment to connect the paths.
All this holds true for closing a straight path as well.
How to edit a curved path
There are a few ways that you can edit your curved path segment:
- Move nodes. Select one node on your path and move it around the canvas until you are happy with the resulting curve. You can move it around by clicking it. Another way is to change the object's XY coordinates from the Arrange Tab.
- Change handles. Select one node on your path and change the direction and length of the handles until you are happy with the resulting curve.
- Delete nodes. By deleting nodes, you will notice how your path will automatically change. Fewer nodes translate into smoother-looking shapes and a continuous curve. Deleting nodes is a good way to make bigger changes to an element's shape. It can also remove any unwanted bumps in your artwork. To delete a node, click on the node you want to delete and then click the Delete button inside the Action Bar. Alternatively, open the Style Inspector and click Delete Anchor Points.
- Add nodes. You can add more nodes by clicking on the path once with the Pen Tool.
- Change the node type. To adjust the corner radius and achieve the desired shape, you can choose between various types of nodes.
Looking for more practice opportunities? Try one of Linearity's thousands of templates, with great base graphics for you to experiment with:
:quality(75))
:quality(75))
How to change Node types
You can change the node type by clicking on the other options in the Style Tab.
You'll notice how your node and, as a result, your current path will change accordingly.
For example, you can change a curve segment back into a straight line by clicking on the anchor point and changing the node Type by selecting Single Node (1) in the Style Tab. It's that easy.
Pen Tool gestures on iPad
Here are some cool additional features to make your life easier, allowing you to achieve different kinds of anchor points and paths without having to use the menu:
Gesture 1: one finger hold
When drawing a new line with the Pen Tool, place a second finger on the canvas to convert the previous node to a disconnected type. A disconnected node allows its handles to move independently, altering the direction and curvature of the subsequent curve.
Gesture 2: two (more) finger hold
Place two additional fingers on the canvas to activate 45º snapping for both node handles. This can help you achieve a Mirrored Node.
Gesture 3: three (more) finger hold
Hold three more fingers on the canvas to enable 45º snapping on only one handle.
Gesture 4: double-tap
Double-tap on the end node (highlighted in red) to end the path.
Ready to create brand assets that pack a punch?
Visit our Academy for free drawing tools courses.
Set up your Pen Tool preferences
You can access the preferences that affect the use of the Pen Tool and other related tools by going to the Document Settings inside the Navigation Bar.
- Snap to Grid. Activating the Snap to Grid feature can be an easy way to create beautiful geometric compositions or simply help you create a horizontal/vertical straight path.
- Snap to Point. Activating the Snap to Point will help you to snap your next (or existing) point to another point. This can be helpful when creating complex illustrations or beautiful lettering designs.
More Pen Tool practice
Combine a straight segment with a curved segment
This is a typical Pen Tool exercise that looks difficult on the surface. But we have a super-easy way for you to do it.
Start with a simple straight-path segment. This is easy. Just select your Pen Tool and click once, then click again in a straight line horizontally. Continue clicking to create the highest point of your curve, then click again to define where the curve ends. We know what you're thinking - you just created a very sharp shape that does not look anything like a curve. But this is where the magic happens.
Click twice on your highest node. Now, your Node type has changed from Single to Asymmetrical. Change the node again from Asymmetrical to Symmetrical in the Style Tab. Then, pull on the handles horizontally until you achieve your desired shape. If you drag them to the maximum, you create a c-shaped curve or perfect semi-circle.
Now, do the same for the second semi-circle.
Check our short video that explains the above in just 19 seconds:
This combination of straight and curved paths is a great way to learn how the Pen Tool works.
Create your own typography (advanced)
Once you've mastered the Pen Tool, creating your own custom typography is an amazing way to practice. While lettering, you will explore the different node types and interesting ways to curve paths, such as creating hand-drawn typefaces.
Be sure to watch this video tutorial from Will Paterson, in which he shows you exactly how to create your next font by using the Pen Tool in Curve:
Drawing a new future
At the outset, it may seem that working with the Pen Tool is tricky. But with a bit of practice and playing around, you’ll soon see how it helps you make incredible designs in the simplest way possible. If you put all our tips into practice, you will learn them in no time.
Linearity Curve is one of the easiest and most intuitive ways to learn the Pen Tool. Unlike Adobe Illustrator, Curve has a unique native feeling, a much cleaner interface, and many other features that will help you tremendously in your learning process.
Mastering the Pen Tool is also one of the best ways to get your first animations going. Linearity Move, our new motion design platform, makes turning your artwork into a moving image easier than ever. If you haven’t yet, check out our plans for teams today.
Remember to share your designs with us. We'd love to see what our talented designer community is up to.


Frequently asked questions
How does the Pen Tool work?
The Pen Tool works by placing anchor points on a canvas or image. These anchor points can be connected to form straight lines or curved segments. By adjusting the control handles of the anchor points, users can manipulate the shape and curvature of the paths they create.
What software supports the Pen Tool?
The Pen Tool is a standard feature in various graphic design and photo editing software, including Adobe Photoshop, Adobe Illustrator, GIMP, and CorelDRAW, among others. Linearity Curve’s Pen Tool performs at a level on-par, often better, than most other platforms.
What can I create with the Pen Tool?
With the Pen Tool, users can create various shapes and paths, including simple straight lines, complex curves, geometric shapes, and intricate designs. It's commonly used for tasks such as creating vector illustrations, cutting out objects from images, and designing logos.
What are anchor points and control handles?
Anchor points are points placed on the Artboard using the Pen Tool to define a path segment’s start, end, and direction. Control handles adjust the curvature of the path between anchor points. Users can create smooth curves and precise shapes by manipulating these control handles.
How do I use the Pen Tool effectively?
Effective use of the Pen Tool requires practice and familiarity with its features. Start by mastering basic tasks such as creating straight lines and curves. Experiment with adjusting control handles to understand how they affect the path’s shape. Additionally, explore the keyboard shortcuts and tool options Linearity provides to streamline your workflow.
Can I edit paths created with the Pen Tool?
Yes, paths created with the Pen Tool are editable. Users can modify anchor points, adjust control handles, and reshape paths even after they've been created. This flexibility allows for fine-tuning and refining designs as needed.
Are there any alternatives to the Pen Tool?
While the Pen Tool is a powerful tool for creating precise paths and shapes, there are alternative methods for achieving similar results, such as using Linearity’s Shape Builder tool, Selection Tool, or brushes. However, the Pen Tool offers unparalleled control and accuracy, especially for complex designs and illustrations.
Where can I learn more about using the Pen Tool?
Check out Linearity’s online tutorials, courses, and templates to learn how to use the Pen Tool effectively. Many software providers offer official documentation and tutorials on their websites, while online platforms like YouTube and design forums feature tutorials experienced users create.
Can the Pen Tool be used for both raster and vector graphics?
Yes, the Pen Tool can be used for raster and vector graphics. In raster-based software like Adobe Photoshop, paths created with the Pen Tool can be converted into selections or rasterized for editing. In vector-based software like Linearity Curve, paths created with the Pen Tool are scalable and maintain quality regardless of size. Try masking for this.

Share this!
Ben Barnhart
Ben is a Content Lead for Linearity living in Berlin. His hobbies include board games, cooking, reading, and writing.