:quality(75))
:quality(75))


:quality(75))

Exciting news! We recently launched our new animation software, Linearity Move. If you haven't discovered this revolutionary tool yet, now's the perfect time to dive into the world of animation.
This simple yet powerful tool is all about making motion graphics accessible for everyone. It empowers designers to become animators, allowing teams to stop outsourcing and bring motion in house.
No fancy skills required—just grab your static vector graphics and let's bring them to life.


How to animate your static assets with Linearity Move
Seamless integration between Linearity Curve and Linearity Move ensures that any design crafted in Curve can be effortlessly animated in Move. That makes the Linearity Suite the ultimate toolkit for design teams of all sizes.
Now, before you raise an eyebrow at the idea of diving into a new software, don't worry. We designed Linearity Move to be incredibly intuitive and loaded it with time-saving features.
Thanks to Auto Animate, the animation process couldn't be simpler. Just set up your key scenes in Linearity Curve, import them to Linearity Move, and let our animation software take care of the rest.
Prepare your Linearity Curve files
To get started, open up the file you want to animate in Linearity Curve.
Give each layer a unique name to keep things organized in Linearity Move. This way, all your layers will be easily distinguishable in the timeline.
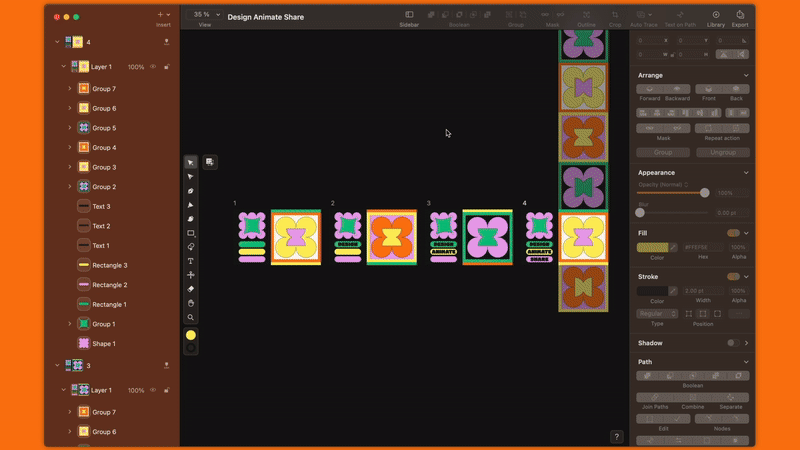
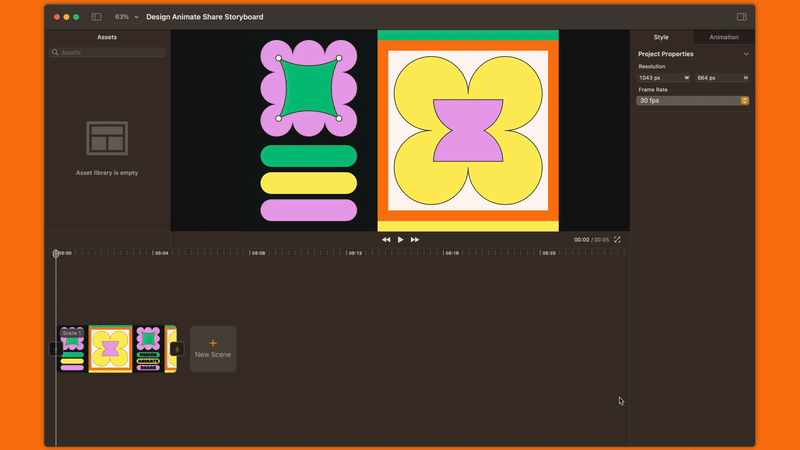
Design your storyboard scenes
In the world of animation, a storyboard captures the crucial moments of your animated sequence. To leverage Auto Animate in Linearity Move, you'll need a minimum of two key moments for the software to create the animation transition between them. Each of these 'moments' should be imported as separate artboards within the same document.
Linearity Curve allows you to work with multiple artboards within a single document, making it an ideal starting point for setting up your animation.
Start by envisioning the story you want to convey and the movement you imagine for each canvas element. Next, duplicate your artboard at least once and modify the canvas elements to demonstrate how you want them to evolve in the animation. For example, you can create a text fade-in effect by setting the opacity to 0 in the initial artboard and 100 in the next. Auto Animate will seamlessly generate the transitional frames for you.
Check out how Maddy does this step in the video below, and download the sample file to practice the process.
Import your scenes to Linearity Move
Once your Linearity Curve file is fully prepared, save it and bring it into Linearity Move via the import button. If you prefer, you can also effortlessly drag and drop your Linearity Curve files directly into Move.
You’ll be prompted to to choose and drag your individual artboards as scenes. Drag them one by one or all at once, and be sure to maintain the correct order.
Moving on, input the preferred duration for your animation. This sets the pace at which your animation unfolds. Afterward, simply press 'import.'
Let the Auto Animate magic happen
For this step, you can relax—there’s no need to lift a finger.
Once your files are imported, our Auto Animate feature takes the reins, seamlessly transitioning between artboards. Just hit the play button to watch the generated animation in action.
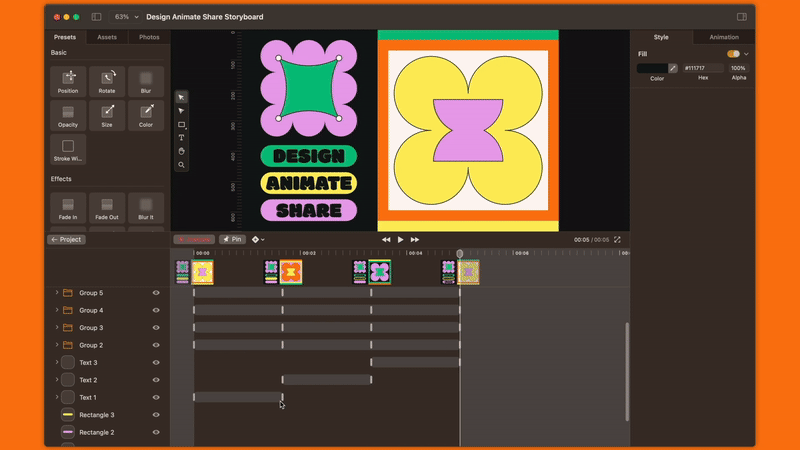
Adjust the results
While Auto Animate takes care of creating seamless transitions between frames, you might want to fine-tune the timing. Simply double-click to open the timeline, giving you the power to effortlessly customize how and when each movement takes place.
To achieve this, just drag scenes and individual elements to various positions on your timeline. The closer two scenes are placed, the faster the transition between them will occur.
If you spot any issues with your animation design properties, don't worry—you can make quick adjustments without switching back to Linearity Curve. Simply switch to Design mode within Linearity Move and make the changes there.
Export your animation
When you’re happy with your animation, it's time to export it as a .mp4 file. Navigate to 'File,' click on 'Export,' and et voila!
And just like that, you created your first animation in Linearity Move! Now it’s time to share it online and impress your audience.


Share this!
Emma Taggart
Emma is a Content Writer for Linearity in Berlin. Her hobbies include making ceramics, roller skating, drawing, and 2D animation.