:quality(75))
:quality(75))


:quality(75))
As a UX designer, you’ll often have to put your imagination to work to bring new ideas to life. One tool that can help with this process is storyboarding. This tool is borrowed from a completely different domain (cinema), but it has already made its mark on the world of UX. Storyboards are great in helping designers envision how users will use the products they design.
Jumpstart your ideas with Linearity Curve
Take your designs to the next level.
What is a storyboard?
A storyboard is a visual form to represent a scenario that contains a sequence of a few events. The Walt Disney studios were the first ones to come up with the idea in the 1930s. Many other fields, including UX design, have adopted storyboarding as a way to represent scenarios visually.
.png)
At this point you, probably ask yourself “Why should I use storyboards?”.
The short answer is that it will help you design faster with more confidence.
Here are the main reasons why this is case:
- An image is worth a thousand words - Our brain processes images much faster than text. By representing a scenario visually, you are speeding up the ideation process for everyone involved.
- Stories are memorable - For centuries, humans have been using stories to pass oral traditions to younger generations because they are much easier to memorize than facts. Using a story as the first step towards ideation can set the right mood for the project right from the start.
- The curiosity gap - Stories, especially the ones which contain gaps, can very naturally create curiosity and activate our brain to try to fill in the missing details. This type of “brainpower” is exactly what you want in your ideation sessions.
- Empathize with a “real user” - Just like we use personas to create empathy with a user who has a face and a name, placing this user in a scenario will create even higher levels of empathy toward users among the members of the design team.
Using storyboards in UX design
Just like script writers and movie directors use storyboards to plan plots in movies and TV series, UX designers can use storyboards to envision and plan user journeys for products. The storyboarding technique allows you to pick one or two characters, and understand not only what they do in every step of the user journey but also why they take an action and how they feel about it.
At the beginning of the ux design process, you’ll have to think about a few pieces of the story you’ll want to define, at least at the conceptual level, before you start sketching anything.
The first step in storyboarding would be to decide who your main character is, and if there are more characters you’d like to include in your storyboard.
In order to create a well-rounded character, you’ll have to think about the following things:
- The basic description of your character that could include things such as name, profession, age, gender, and anything else that’s relevant
- What motivates this character to use your product or service?
- In what context does your character use the product?
The second step in storyboarding is defining the user journey itself and its different parts. It’s good to familiarize yourself with the parts of a typical user journey for products since it will help you think about what you want to include in your storyboard. This will include details such as:
- Awareness - how will users learn about your product or service in the first place?
- Consideration - what decisions they will have to make before they decide to buy the product and use it?
- Buy - how will your users buy the product?
- First experience - what will their first experience with your product look like?
- Usage habits - what will their regular usage pattern look like?
- Main benefits - what will your users gain from using your product?
If it’s too hard to try and decide on all these things right from the start, you could start by describing only the initial stages of the user journey and include only these parts in your storyboard. These include Awareness, Consideration, Buy, and the First Experience with your product. Once you flesh out these details it will be easier for you and for your team to extend the storyboard and include details around the long-term use of your product.
Get creative with our ready-to-use templates.
Linearity Curve offers templates for every social media platform and various use case templates for posters, business cards, slides, app store screenshots, and more.
Getting started with storyboarding
.png)
To get started with storyboarding you will also have to think about a few different things. Here are some helpful guidelines:
- Using the structure of a story with a beginning, middle, and an end; focus on the goal your character needs to achieve. Don’t jump straight to solutions in your storyboard.
- Think about the tools you will use to create the storyboard. You can use pen and paper to sketch a storyboard, or use a graphic design software, depending on your preference.
- Think about the level of detail you want to include in the story. Depending on where you are in your development process, you may want to create stories that have a greater or lesser amount of detail, but remember to always allow some room for imagination.
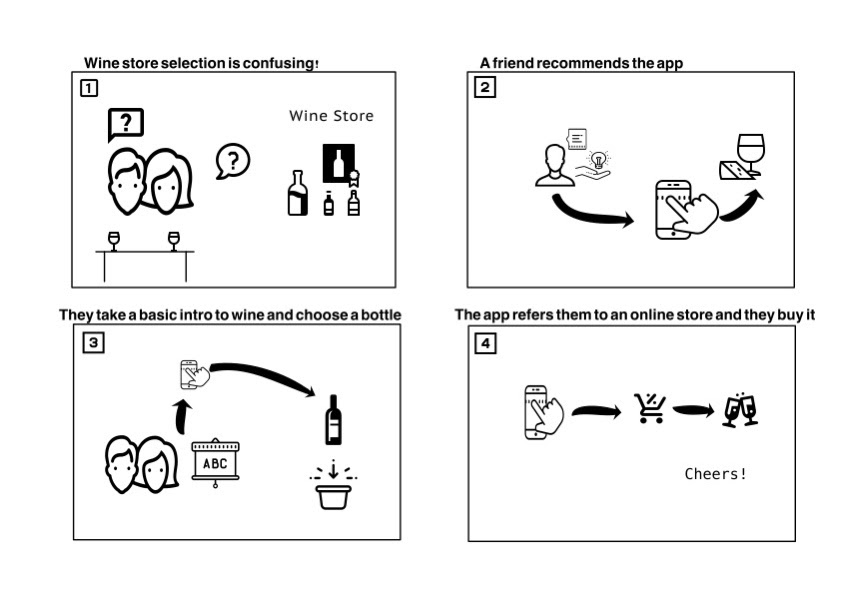
To help you put together a nice UX storyboard, let’s look at a real-world example.
Let’s assume that you want to help people who love drinking wine but get overwhelmed in wine stores while trying to make a choice about what to buy next.
Let’s assume that you want to target people between the ages of 25 and 45 who are just now taking their first steps towards understanding wine better. You decide to build an app to help them called “Wine Time”.
Your next step is to start envisioning how people will use your app. So you decide to create a storyboard.
Let’s go through the process.
Our story begins with the main characters, Jason and Nathalie, a young couple in their early 30s. They live in the suburbs of Toronto, Canada. They love drinking wine, and they go once every three weeks to their local wine store to buy 2-3 bottles of wine. They usually buy the wines that are promoted by the store, and they occasionally get a recommendation from a friend about what to buy. They recently have been wanting to start exploring more wines, and they want to be less overwhelmed with the wide selection at their store. Up until now, they’ve pretty much been buying the same wines every time. This is what motivates them to try to look for a solution to know more about wine.
Jason started reading about wine in his free time, but he still doesn’t find it to be very helpful. Most of the wines described in those articles are from Europe, and he lives in Canada. He is not certain if the local wines he finds in the store nearby are comparable in any way.
One day, Nathalie’s friend Alison suggests that they try a new app called “Wine Time”. The app helps you learn about wine and helps you find wines that you’ll like. At this point in the story, Jason and Nathalie become aware of the product.
They download the app, and immediately take a quick “Introduction to Wine” tutorial. The tutorial teaches them about what type of wines may like based on different characteristics. This would correspond to their first experience with the app and their “Aha” moment (most likely). We can think about this part as the beginning of the middle of our story.
Ready to create brand assets that pack a punch?
Visit our Academy for free storyboards in UX design courses.
At the end of the tutorial, Jonathan and Nathalie stay on the app. "Wine Time" suggests wines for them and checks if they are available in stores nearby. Once they find a couple of bottles that they like, they order them online and receive them within two days. This part of the story would correspond to the buy stage in the user journey. It could potentially also be linked to the future use of the app if they decide to continue ordering wine from the app to save time.
This is where our story ends, and where our characters understand how to use the “Wine Time” app to achieve their goal of exploring more wines.
Next, let’s talk a bit about tools for creating your storyboard.
As you can see in the image below, you can create a simple storyboard as I did in Vectornator. You can use their icons, as well as some text to visualize your story plot. I decided to present the user journey in four stages to leave some room for discussion about the details that are not part of the storyboard.
.png)
Keeping the storyboard at the current level of detail could provoke interesting questions at the ideation phase, such as:
- Which tutorials will the app include?
- Where in the world will the app be available?
- What kind of online wine stores should we connect it to?
- What will the long-run use look like?
Take a look at the storyboard I created for the “Wine Time” app.
In short, storyboarding is an excellent tool you can use as a UX designer to bring conceptual ideas to life before you start ideating with your team. Visualizing scenarios can make the process a lot more interactive and fun for everyone. To represent many scenarios, you might need more than one storyboard, but this need will become clearer over time. The most important things to remember are: get creative and have fun.
Jumpstart your ideas with Linearity Curve
Take your designs to the next level.
Share this!
Emma Taggart
Emma is a Content Writer for Linearity in Berlin. Her hobbies include making ceramics, roller skating, drawing, and 2D animation.